Showing posts with label Gelli Arts® - Gel Printing Plate. Show all posts

Nov 30, 2020

I'm Teaching in Creative JumpStart 2021!

I'm sooo excited + honored to be teaching in an online workshop called Creative JumpStart (CJS), hosted by my friend Nathalie Kalbach. 

⁠What is Creative JumpStart?

It’s a one-of-a-kind online mixed media workshop, designed to kick your creativity into high gear from January 1st through February 14th 2021, and BEYOND. Learn techniques, discover new materials + connect with other artists + crafters.

There's a powerhouse of talent in the lineup this year - 45 Mixed Media Artists are ready to jumpstart your creativity in 2021. Check out this cool banner of all 45 teachers! 

Artist Teachers for Creative JumpStart 2021

This edition of CJS is super special because it's the 10 year anniversary! Woohooo! A super special milestone deserves a super celebration sale, right?! We'd love for you to enjoy our Cyber Monday sale.  

Sign up here >>> bit.ly/CJSMartice


In my lesson, we'll take a stroll around my hometown of Kansas City + I'll teach you how to create a stack of city-inspired collage papers, loaded with messy stenciling + graffiti mark-making techniques.

Kick-off 2021 with a new video every day beginning January 1st, all the way through February 14th. The price is going up tomorrow, so if you want in, today's the day to get the best deal.

Sign up here >>> bit.ly/CJSMartice

You can get Creative JumpStart 2021 for just $49 USD today. (That's only $1.09 per video!)

Our Cyber Monday Sale ends tonight, November 30th at 11:59pm EST. ⁠

See ya in class!

⁠⠀


Feb 10, 2018

NEW VIDEO: Gelli Printed, Stamped and Collaged Cards

Hi creative lovelies!

RubberMoon Art Stamps has published another project from moi:

You're gonna be so proud of me because I created a...

That's right. I'm really enjoying the whole process of filming, editing + yes, being in front of the camera, for a change ;-)


Gelli Printed, Stamped and Collaged Cards video tutorial
Gelli Printed, Stamped and Collaged Cards by Martice Smith Fine Art + Design
Watch the video here: http://bit.ly/CollagedHolidayCards

This project is step-by-step, super fun + whimsical set of cards that I made from leftover scraps of stenciled gelli prints.

These were gifted as Christmas cards but you can use these same techniques to make your cards for, just about, any occasion.

Here's the general supply list:
  • Stamps (RubberMoon)
  • White cardstock, cut down to size of card you want to make
  • Stack of gelli prints
  • Neon fluorescent acrylic paint in an applicator bottle (I’m using Sizzling Pink by DecoArt Americana Acrylic)
  • Adhesive / Matte Medium
  • Foam dots (to add dimension)
  • Small paintbrush
  • Permanent Ink pads (black and gold)
  • Scissors

Grab your supplies + come play with us over on the RubberMoon Artmosphere blog!

Gelli Printed, Stamped and Collaged Cards video tutorial
Gelli Printed, Stamped and Collaged Cards by Martice Smith Fine Art + Design
Watch the video here: http://bit.ly/CollagedHolidayCards

P.S. If you haven't already, I'd LOVE for you to give me a little boost of love + confidence over my YouTube channel. Don't forget to subscribe + click on the bell icon to receive alerts whenever I drop a new video!! Thank youuuu


Sep 20, 2017

NEW VIDEO: Jumbo Gelli Printed Tags

I'm at it again, friends...

NEW VIDEO ALERT!!

I had the great honor of being a guest designer, again, over on the Stencil Girl blog and was so happy to be able to create these tags for my art journals.


In this video, I'm sharing 3 ways to add contrast in your artworks using: SHAPE, TEXTURE + COLOR.


Watch me play with stencils on the Gelli Arts Gel Printing Plate to create JUMBO gelli tags for my art journal!


3 ways to add contrast in your artworks using: SHAPE, TEXTURE + COLOR. Watch along as I create these JUMBO gelli tags for my art journal!

**Also, please some me love by leaving a "thumbs up" + SUBSCRIBE to receive notifications when I upload new videos!**


Link to watch the video >> https://bit.ly/JumboGelliTags2

Catch the written tutorial of Jumbo Gelli Printed Tags over on the StencilGirl Talk blog.


Thank you lovelies!
xo, Martice


Sep 10, 2017

NEW VIDEO: Creating a Layered Monoprint with RubberMoon Stencils


Hello creative lovelies!

Today, I’m giving you behind-the-scenes access to watch exactly how I create my super fun backgrounds.

Armed with only a handful of supplies, you get to watch my every move as I build up layers of color and texture, create a sense of depth + sprinkle everything with some hand lettering.

By the end of this video, you’ll feel more confident to approach the blank page or canvas, equipped with a bunch of easy to apply techniques to your own masterpieces.


LINK TO VIDEO* > > https://youtu.be/g-eE_eBeM8g
*Subscribe to receive a notification when I upload a new video! ;-)

RubberMoon Stencils:


Supplies + Tools used:
  • Paper to print on (white cardstock)
  • Acrylic paints (Titanium White, Sap Green, Cerulean Blue)
  • Gelatin plate + Rubber brayer
  • Sponge
  • Craft mat or paint palette

::Project steps::

STEP 1// Create a monoprint using a stencil and a gelatin printing plate.

STEP 2// Apply second color; Pull second print

STEP 3// Stencil directly onto pulled print
Using acrylics and a cosmetic sponge, hold the stencil in place with one hand as you pounce the acrylic paint onto the stencil. (A sponge allows you to have more control and to help you vary your pressure.)

Remember to pounce off excess paint to prevent seepage under your stencil.


STEP 4//
Journal with paint pens + embellish!
Add dots, lines and repeat shapes from stencil design.

There is no wrong way of doing this - just have fun, make bold color moves and enjoy the process of experimenting!

----

I hope you enjoyed my video on creating textured backgrounds enhanced with RubberMoon stencils.
xo Martice

Aug 6, 2017

Digital goodies just landed in my shop

Happy August, my creative lovelies,

I have a new, digital goodies alert for you!!

Feast your eyes on my brand new, graffiti-styled downloadable STICKERS!

"Tribal Chic" collection of Collage Stickers from MarticeSmithArt.com
"Tribal Chic" collection of Collage Stickers from Martice Smith Art + Design

I wanted to offer an affordable option for you to get my art in your hands + into your own awesome creations. (If you have any suggestions on other products you'd want, please message me via the Contact form on my website.)

(Seriously, I'm like a toddler, running around the playground + squealing with joy over these boldly saturated beauties!) This collection has been all types of FUN. What's not to love? 

I've designed TWO sets - both are inspired by the symbols, tribal mark-making + grungy textures found throughout my artwork.

My hope is that these stickers, not only infuses joyful color into your world but also:

  • Make you feel loved, encouraged + makes your creative process even more magical. 

Basically, the more colors you have, the better you'll feel. It's science.


BUT WAIT - THERE'S MORE!

You have the option of getting BOTH SETS of stickers as a bundle!

With the BUNDLE, you'll receive:
  • 24 hi-quality unique stickers (instead of 12)
  • unlimited reprints! Save the PDF to your computer + print them out as many times as you want

 Bundle of Collage Stickers from MarticeSmithArt.com
"Tribal Chic" BUNDLE of Collage Stickers from Martice Smith Art + Design


From my heart to yours, the "Tribal Chic" collection of stickers is now available!


P.S. When you purchase any set of stickers, you get *unlimited* reprints!

Apr 10, 2017

April Art Challenge Days 6-10, Plus a Roundup!

:: Trumpet fanfare ::

We made it past the first week of our challenge! Woohoo!

I am blessed + completely in awe of the participation + encouragement that's been shared during this challenge.


Want to join in? It is never too late.
Get all the details for the 30 day art challenge HERE.


Here are two things I love about this challenge:
1. working on a smaller scale (Most of the time, I'm working on 9x12 or larger if it's commissioned pieces.) There's not a lot of pressure, which means, I get to enjoy being in the moment, creating something that makes me smile.

2. cheering for other people! I'm as proud as a mama hen when I look at the work that's being created under the hashtag #MarticeSmithArtdaily30. I make an effort to respond to EVERYONE'S posts. I leaving thoughtful comments - not what you might expect, right?! Well, I like to let you know what moves me, what makes me say 'You go, chica! You are rockin' this prompt!' Emojis can only say so much...

Take a look at how I've been tackling each prompt...

DAY 6: SPLASH

DAY 7: REVERSE

DAY 8: STAMP

DAY 9: PATTERN PLAY

DAY 10: LEAST FAVORITE FOOD


 Download prompt list

SHARE THE INSPIRATION!

Here is a roundup from people who are joining in, from all over the wooorld!

Guessing game time!! See if you can you match the artwork with its prompt.  


Curious to see what other artists are creating? While you're visiting Instagram, search for the hashtag #MarticeSmithArtdaily30 or click here:

View photos from #MarticeSmithArtdaily30 on Instagram


Remember: you can start with DAY 1 or skip around to any prompt that speaks to you. Just have FUN!

download art prompts

Aug 22, 2015

Belladonna inspiration and Yummilicious collage papers

Hey hey, lovelies!
I LOVE going for early morning meditation walks. During my walk yesterday, I saw these gorgeous Belladonna lilies and quickly took a photo of them to share with you + I knew they would inspire me to play, once I got back in the studio...

Even though portions of these flowers are wilting, I find beauty in it all.
** Do you see how the centers of the lilies resemble mini suns? 
** Take a closer look: notice the subtle change of bubblegum pink color fading into a warm tan color as the flower wilts away.
** the grass is dead YET these are still blooming!

Perfect example of how WE should find ways to THRIVE in less than ideal circumstances.

Belladonna Lilies; Color palette inspiration from Martice's nature walk
Belladonna Lilies; Color palette inspiration from my nature walk

Side note: I just realized these compliment my sizzlin' Summer colors! Hmmm, makes me wonder if I could be looking for these colors, subconsciously...

Back in the studio, I imported my picture into Photoshop. I selected 5 colors directly from the picture (using the eyedropper tool), to create my own color palette. 

My idea was to design a collection of collage papers ONLY using these colors + white. Ha! Not as hard as I thought it would be!

Guess what? There will be an awesome collection of these yummilicous papers, so keep watch!
 (Better yet, you should join my MUSELetter to know when they're released.)


Each collage paper overflows with intricate stamp + stencil detailing, abstract shapes, patterns, doodling, mantras + of course, it wouldn't be me if it didn't have bold COLOR IMPACT!

Take a look at this one on my desk...
Yummilicious Collage Papers by Martice Smith II

For these collage papers, I mixed my own colors, using: DecoArt Media Fluid acrylics:
Pyrrole Orange
Vermilion
Quinacridone Magenta

DecoArt Americana acrylics:
Banana Cream
Dragon Fruit
Yellow Ochre 

other tools: 
8"x10" Gelli Arts® - Gel Printing Plate
Handmade Foam Stamps and Printing Plates (click to see tutorial!)


Enjoy the sunshine + inspire yourself! Happy creating :)


Jun 1, 2015

Altered Mini Composition Booklets

Today, I'm starting off with a quick tutorial to how to make your own altered, mini booklets.
If you are like me, you feel that the design on those school composition books are just too plain Jane...not your style, at all.

Seriously, what is that faux-leopard-polka-dot-design called anyway?? Anyone?

I'm gonna show you how to jazz those babies up with some beautiful gelli prints + luscious colors. Follow me on the Helmar blog to see the full tutorial!

http://bit.ly/AlteredMiniBooklets
TUTORIAL | How to Make Altered, mini-Composition Booklets


http://bit.ly/MSARTnewsletter

May 19, 2015

Creating UNITY with Repetition

Hi! Today I'm talking about how to create unity in your art journal pages by repeating your favorite elements. If you follow The Documented Life Project, you'll know that our May challenge is all about my fave techniques...Touchy Feely (Texture) using modeling paste. Let's pLaY!!


Here's my supply list overview:
Gelli Arts® - Gel Printing Plate
Art journal
Modeling paste
  
Yummy colors to play with: 
Media Fluid Acrylics from DecoArt Media:
  • Pyrrole Orange
  • Quinacridone Red
  • Cobalt Teal Hue
  • Banana Cream (this one is by Americana)
+ small dot of Titanium White
+ small dot of Dark Grey Value 3

Stencils to hoard (oops! I mean to 'use'):
Alphabet Spaghetti
Snake skin
Deconstructed Floral Bouquet


Creating UNITY with Repetition

Repetition, one of the Principles of Design, is helpful when you're layering. Repeating elements (shapes, lines, colors, textures, etc.) creates unity within a work of art + helps you keep control as you build up layers.

Here are 3 tips on how to make this work:

TIP #1// Limit yourself to 3 or 4 stencils + colors, repeating them all over your page/canvas.

TIP #2// Play with a variety of sizes.

TIP #3// Overlap elements. (Use deli or tracing paper add extra dimension.)


Remember, once you master the rules, you can break them mugs like a #BOSS!


My process: 


  • First, I decoupaged a yellow + orange monoprinted scrap onto my journal page.
  • Then stamped with the Alphabet stencil; outlined certain areas with pencil.
  • Glued a piece of deli paper tagged with my graffiti writing - making sure to overlap some of the Alphabet stencil + pencil marks.
  • Finally, I applied paint with my fingers into the Deconstructed Floral Bouquet stencil. Wipe away some paint with baby wipe.


MarticeSmithART-Creating UNITY with Repetition
Creating UNITY with Repetition | collage by Martice Smith II


Oh look, there's more!

Here, I spread a very thin layer of modeling paste through my snake skin stencil. I played around with the ratio of modeling paste + water vs. modeling paste + glazing medium.  
My goal was to experiment to produce a translucent effect.

Ooooh weee!
I like the mixture of glazing medium the best. (The texture of the modeling paste softens up compared to the mixture of modeling paste + water, which produced teeny tiny air bubbles with no raised areas.)

See how the magenta peeks through the gray? That's because I used a glazing medium!
I know you just wanna reach into the screen + touch it, don'tcha?

MarticeSmithART-Creating UNITY with Repetition; detail

...and of course, more hand-lettering ;-)...

Notice that I incorporated 3 variations of my hand-lettering:

variation #1: I wrote directly on the surface of the page with a black ink pen.

variation #2: Using the handle end of my paintbrush, I scribbled into the acrylic paint while it was still wet (gray area).

variation #3: I used a black Sharpie to write chunky letterforms onto a scrap piece of deli paper.

Great way to repeat the same element, in different ways. We're creating UNITY!
 
MarticeSmithART-Creating UNITY with Repetition; lettering details


What kind of things do you intentionally repeat in your mixed-media collage works?

(If you're not sure, take another look at a few of your journal pages to find them, then come back to share a link in the comments so we can check 'em out, too!)


http://bit.ly/MSARTnewsletter

May 8, 2015

Paper Collage and Stenciled Card

Paper collages are very easy to make and they're the perfect craft activity for the kids!
Since Mother's Day is just a couple of days away, you can whip this up in no time.

I love creating cards like this because it's so personal and, I promise you, they will hold up way better than a regular, store bought card. I credit the layering of monoprints, paper scraps + thick decoupage!

Oh, I should also mention, this is a terrific way to use up those paper scraps you have laying around - time to let them go, my friend!


Meet me over on the Helmar Blog to see the full tutorial + leave some comment love ;)

MarticeSmithART- Paper Collage & Stencil Card tutorial
Paper Collage & Stencil Card  |  TUTORIAL


http://bit.ly/MSARTnewsletter

May 6, 2015

Radiant Neon Amplify! | Product Review

Have you ever tried the new Radiant Neon Amplify! writers?
No? Well, now is a good time to start! I'll show you a few ways to use these bad boys in my product review, which has been published on the Mixed Media Art website.

(Side note: I get so jazzed when my articles and tutorials get published...even though I am on the Article Writers Team, which means, tutorials are to be expected every month. To me, it's like watching my dream unfold all over again, each time.)

This month, I had the wonderful opportunity to play (oops! I mean "work") with a new line of paint products from Imagine Crafts + write up a helpful review.


Selection of Radiant Neon Amplify! writers | Product Review

Splash a bit of neon color on your mixed-media art creations! I'm sharing my review of the Radiant Neon Amplify! Writers by Imagine® Crafts. Discover how versatile and playful you can be with these products. Learn how to use them on the Gelli Arts® - Gel Printing plate, in your art journal and even with a stencil. After this review, you'll be wanting to add the Radiant Neon Amplify! Writers to your art supply stash!

I even used a few of these colors in my Art Journal Flip Thru VIDEO!

Can you guess which warm colors I used? 


Apr 16, 2015

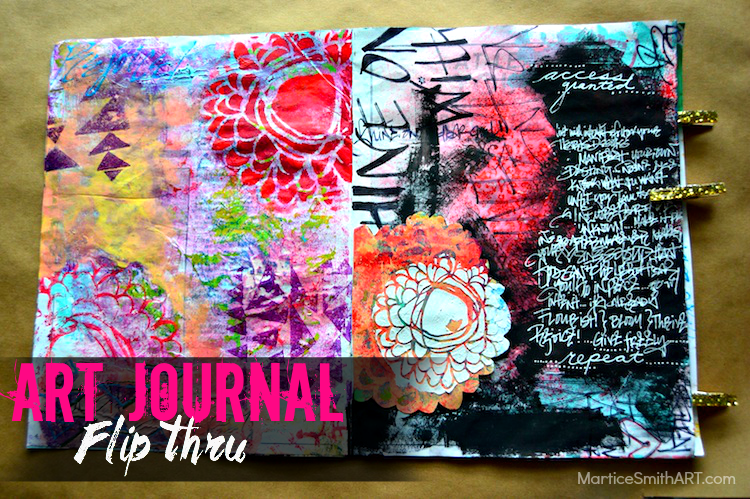
New Video Series: Art Journal Flip Thru 1

I am super excited to announce my *new* series of videos, giving YOU the inside scoop on my visual journaling process + creative lettering skills.

Sit back, enjoy luscious layers, explosion of color, bold + empowering messages, straight from my heart to yours.

These will be short videos, under 3 minutes - just enough to re-energize your creative palette + have you trying out techniques TODAY!

Art Journal Flip Thru #1 by Martice Smith II

    This isn’t your average "peek inside my art journal" video.
    Let me explain:
      • This is where you are given permission to play + explore new techniques, delivered in high-quality production...
      • This is where you get to ask your most burning questions about mixed-media art journaling (without feeling intimidated) + soak up all the in-depth, expert advice like a sponge...
      • This is the time to be nourished, uplifted in spirit + connect with other creatives...
      • This is the place where you allow your free-style imagination to run wild; to find the courage to make BIG changes...to always DECLARE that your creative expression matters!

      This is my platform to demystify the ideas of the "perfect" art page + reveal my process of intuitive art-making by showing you how I work.

      Discover how you can go from lack of personal style to overflowing with new ideas that you can barely keep up with yourself!! You will never suffer from "white page syndrome" when you're learning from me!


      Well, it seems like you get my point now, right? Great!


      I hope you enjoy Art Journal Flip Thru #1!


      (If you cannot view the video, click HERE. Allow video to fully load before playing in HD.)


      Be the first to know when I release more Art Journal Flip Thru videos!


      Oh, look! There's MORE! 

      I will also share a few of my techniques via tutorials so that you can recreate these pages in your own way.
      (If you are a regular reader of my blog, many of them will be familiar to you but there is always something new in the making, over here in my studio.)


      Art Journal Flip Thru #1 
      :: Feature Techniques::


      Hand-carving large flower stamp by Martice Smith II; http://bitly.com/StampCollection-Super-size


      Package Tape Tutorial by Martice Smith II; http://bit.ly/PackingTapeTransfer


      Handmade #FoamStamps & #Printing Plates Tutorial http://bit.ly/FoamStamps-PrintingPlates


      **Other products include:
      DecoArt's Media Fluid Acrylics
      Americana multi-surface acrylics
      black gesso 
      liquid glass
      Alphabet Stencil (Andy Skinner; DecoArt)

      Crackle Paint 
      Gelli Arts® - Gel Printing Plate 
      Deconstructed Floral Bouquet (from StencilGirl)


      What techniques you are dying to learn? Don't hold back - let me know your TOP 3 journaling techniques you are having trouble with or wish to learn more about.


      sending you love, with paint-covered hands!

      Dec 10, 2014

      Personalized Gift Tags - On the Gelli Arts® - Gel Printing Plate

      Two weeks away! Christmas holiday will be here before we know it!

      To me, a gift isn't complete without the finishing touches. By finishing touches, I mean, the addition of your charm to make it special. How about some personalized gift tags?!

      I have a very cool way to make mines using a gelatin plate as my starting place. Find out how to create them, HERE.

      Personalized Gift Tags - On the Gelli ® Plate


      Personalized Gift Tags - On the Gelli Plate • Tutorial by Martice Smith II
      • Personalized Gift Tags - On the Gelli® Plate •


       DecoArt has some great stencils! For this project, I used the Tags & Labels stencil.

      Tags & Labels stencil (DecoArt)
      Tags & Labels stencil (DecoArt)

      Personalized Gift Tags - On the Gelli Plate • Tutorial by Martice Smith II
      Kraft paper gift tags with doodles, acrylic paints, stamped images, and a dimensional, flower sticker. Tutorial HERE

      Have fun creating magical moments!


      http://www.marticesmithart.com/newsletter

      Nov 11, 2014

      Sneak peek number 2...And the WINNER is...

      Hey friends! As promised, here's sneak peek #2!

      These are monoprints, pulled directly off my Gelli Arts® - Gel Printing Plate.
      I played with neon fluorescent paints by DecoArt and, of course, incorporated some bold mark making and graffiti.
       
      I *LOVE* the grungy textures and build up of color I get with each print. I've already learned sooo much from this intuitive painting process...I'll be teaching you in my lesson in the 'My Color is Beautiful Art' 2015 workshop.
      By the way, did YOU win? (The winner of my giveaway is at the bottom of this post...)

      Registration is now open, so if you didn't win, don't worry - you can still join us! The ENTIRE workshop is $49USD. You totally deserve this unique experience from some of the most talented mixed media artists out there. (my bad, I'm a tad bit biased, lol!)

      http://bit.ly/MS-MCiBA2015

      In my class, I can and will meet you at your level - beginner or more advanced. We're gonna have a blast!

      ....Enjoy the peeks...

      Phases 1&2: Intuitive Painting and Doodling, Martice Smith II online workshop 'My Color is Beautiful Art'
      Sampling of monoprints/Gelli® prints created for my upcoming workshop, 'My Color is Beautiful Art'

      Phases 1&2: Intuitive Painting and Doodling, Martice Smith II online workshop 'My Color is Beautiful Art'

      Phases 1&2: Intuitive Painting and Doodling, Martice Smith II online workshop 'My Color is Beautiful Art'

      Phase 2: Doodling, Martice Smith II online workshop 'My Color is Beautiful Art'
      Phase 1: Intuitive Painting, Martice Smith II online workshop 'My Color is Beautiful Art'
      Did you miss the first sneak peek? Click HERE to learn more about my fun, 3-part lesson.

      Click the orange button, below, to register for the workshop.

      You'll be redirected to Tiare Smith's website (she's the coordinator of this whole shebang)...

      At the bottom of her post, you'll find the registration info. Check out from there and you're good to go!
      Got questions? No problemo! Leave a comment or email me HERE and I'll help you ASAP.
      http://bit.ly/MS-MCiBA2015


      ***The winner is....Sue Chesley***CONGRATULATIONS!


      Thank you all for helping me spread the word and entering my giveaway. I appreciate YOU! xoxo

      Later!


      http://www.marticesmithart.com/newsletter